2016/09/30

2015/02/10

2015/02/06
2015/01/10

2011/05/03
Selecting a Radio Controlled Model Sailboat
Select a Radio Controlled Model Sailboat
RC model sailboats are fun for all ages! You can choose your boat from among many alternatives. These range from prebuilt to designing and building your own. Factors to consider include your level of experience, where you plan to sail your boat, how competitive you want to be, and, of course, your budget. Whatever you decide you'll discover a great way to spend time outdoors with family and friends.
2011/03/14
Rustic Model Boats
The owner is Mike John. Many of you know him from the Duckworks online amateur boatbuilding magazine owned by Chuck and Sandra. This site will help you find the information you need.
The site is about cruising model boats. Not the racing classes, but rather the sort that slowly meanders across a pond rather than race a course
John invites skippers to gather and just have their boats
meandering around in a relaxed way at
Lake Macquarie, Australia.
2009/06/02
2009/05/05
Memories from 1911 about Model-yachting
Model-yacht regattas are very different from the toy-boat matches indulged in by children from one side of a pond to the other. They take place upon sufficiently large bodies of water to allow a course at least a quarter of a mile in length, which is generally sailed twice or three times over to windward and backward. Triangular courses are also sailed. Racing rules correspond generally to those controlling regattas of large boats, and there is full scope to exhibit all the proofs of good seamanship. The yachts are followed in light skiffs, and may not be touched more than a certain number of times during a race, on penalty of a handicap. Racing measurements differ in the various clubs, but all are based upon length and sail-area. In Great Britain the regular Yacht Racing Association rule has been generally adopted, and handicaps deducted from it. In America models are divided into a single schooner with a maximum load water-line of 63 in., and three classes of sloops, the first class including yachts with water-lines between 48 and 53 in., the second class those between 42 and 48 in. and the third and smallest class those between 35 and 42 in. A yacht with a shorter water-line than 35 in. must race in the third class. It has been found that yachts of smaller dimensions possess too little resistance to the wind.
See Model Sailing Yachts; in Marshall's Practical Manuals series, 1905; and How to Build a Model Yacht, by Herbert Fisher (New York, 1902).

2009/05/03


2009/04/28
Sailing Model sail control winch options
Winch? Which Winch?
From: "Douglas" Subject: [Star45] Winch? Which Winch?
To: Star45@yahoogroups.com
Is the Hitec HS-785HB Sail Winch Servo enough for the star or is the RMG the must have for the star? Is there any other options, better options with regards to a drum servo? Is the drum the best choice? What's your opinion, I'd very much appreciate it?
Doug
--
From: "jfisher"
I have not use an arm winch for years, but one difference I found was that they tend to use more power than the RMG. I usually use about 600 mah in 3 hours of sailing with an RMG. So I run 1340 lipo’s and swap at lunch on a big regatta or not at all on club days. Only 80g for the battery. I usually use more battery out of the TX than the boat.
I also don’t like that the power of an arm winch changes depending of your sheeting. On my M it used to sheet out while reaching on the puffs. With the RMG this doesn’t happen. I have considered the new digital ¼ scale servo’s since they are super fast. Now you can gybe without losing speed.
If you want a cheap drum and have not used an RMG before the Hitech drum winch is a good choice, about $50. But once you sail with an RMG with its quicker speed you wont want to go back. Also you will need a more advanced radio to change the sheeting length as it only turn 3.5 turns, while the RMG has programmable travel.
--
From: Larry Ludwig
The Futaba 5801 is an excellent choice for the Star 45, and has one particularly nice feature in the form of a set screw that allows you to dial the travel length right there with the winch installed. It is also considerbly cheaper. The winch retails for $149.00 from www.towerhobbies.com and they have a special right now for a $150 order take off $15.00 so $135.00 and it may even qualify for free shipping. Smoking deal.
Personally, I prefer a swing arm over the drum winches because of reliability. I know several guys that swear that they have never had a drum "spool off" but I am the opposite, I have never had one that did NOT spool off at one point. Just my .02 but I don't know of a swing arm winch that I like for the Star, they are either too big or too small. If I was to pick one, I would say the Ozman or Probar, I think those are still available.
posted by Dave_Mainwaring # Tuesday, April 28, 2009

2009/04/25
Materials for spars (from 1995 discussion)
Saturday, April 25, 2009
Materials for spars (from 1995 discussion)
[quote]
Date: Wed, 8 Feb 1995 09:32:51 -1000 From: tanaka_be@swam1.enet.dec.com (Bert Tanaka) Message-Id: <9502081930.AA09897@mts-gw.pa.dec.com> Organization: Harvard University Office of Information Technology Subject: New Product - Improved SkyShark 2P rod
I got a set of the new 2P spars from SkyShark and tested them in my Legend IQ ultralight that normally uses the 3P spars. This is a nice 8 gram rod. The old 2P was the same diameter as the 3P, 5P and 7P, which made it convenient because it was interchangeable with the same fittings that are used on the other rods. Although it had a pretty good stiffness to weight ratio, it was also a bit fragile for the heavy use and harsh flying that I like to do. I've never used them because I could break them so easily.
This new 2P is made with a smaller diameter. A concept Erez says that was suggested by David Lord. I believe he used the diameter spec Dave suggested when the new mandrel was selected. Otherwise, it appears to have all the same characteristics of the old rod, except that it is much, much tougher.
I've been flying with it for a while now and have been doing a lot of ground rolls, tip stabs, coins, cartwheels, and hard snap stalls (basically, I've been trying to break them!). Ground work and hard snapping maneuvers will weaken a rod but so far, this new 2P has held up wonderfully. This one is probably tough enough to accept a set of Power-Tite connectors which help to stiffen up the frames made of light weight spars. At any rate, it has proving to be a very durable performer for me.
Good Winds, Bert
= = = = = = = = = = = = = = = = = = = = = = = = = = = = = = = = = = = = = = =
Date: Thu, 9 Feb 1995 12:19:06 -1000 From: bwg001@carina.unm.edu (Brian W. Gordon) Message-Id: <3he4cq$o30@lynx.unm.edu> Organization: University of New Mexico, Albuquerque Subject: Re: New Product - Improved SkyShark 2P rod
Bert Tanaka (tanaka_be@swam1.enet.dec.com) wrote: : I got a set of the new 2P spars from SkyShark and tested them in my : Legend IQ ultralight that normally uses the 3P spars. This is a nice : 8 gram rod. The old 2P was the same diameter as the 3P, 5P and 7P, which : made it convenient because it was interchangeable with the same fittings : that are used on the other rods. Although it had a pretty good stiffness : to weight ratio, it was also a bit fragile for the heavy use and harsh : flying that I like to do. I've never used them because I could break them : so easily.
: This new 2P is made with a smaller diameter. A concept Erez says that was : suggested by David Lord. I believe he used the diameter spec Dave suggested : when the new mandrel was selected. Otherwise, it appears to have all the same : characteristics of the old rod, except that it is much, much tougher.
: I've been flying with it for a while now and have been doing a lot : of ground rolls, tip stabs, coins, cartwheels, and hard snap stalls : (basically, I've been trying to break them!). Ground work and hard : snapping maneuvers will weaken a rod but so far, this new 2P has held : up wonderfully. This one is probably tough enough to accept a set of : Power-Tite connectors which help to stiffen up the frames made of : light weight spars. At any rate, it has proving to be a very durable : performer for me.
: Good Winds, : Bert
Thanks for the great info Bert! How do you think these spars will hold up (in terms of toughness) to other SUL spars like the G-Force?
Keith Kidder
= = = = = = = = = = = = = = = = = = = = = = = = = = = = = = = = = = = = = = =
From: Date: Fri, 17 Feb 1995 01:44:26 -1000 From: mainwari@k12.oit.umass.edu(Dave Mainwaring (Northeast Resources))) Message-Id: <1995Feb17.114426.12799@k12.ucs.umass.edu> Organization: University of Massachusetts/Amherst K-12 Information System Reply-To: mainwari@k12.oit.umass.edu(Dave Mainwaring (Northeast Resources))) Subject: Re: New Product - Improved SkyShark 2P rod
In a previous article, bwg001@carina.unm.edu (Brian W. Gordon) says:
/>Bert Tanaka (tanaka_be@swam1.enet.dec.com) wrote: />: I got a set of the new 2P spars from SkyShark and tested them in my />: Legend IQ ultralight that normally uses the 3P spars. This is a nice />: 8 gram rod. The old 2P was the same diameter as the 3P, 5P and 7P, which />: made it convenient because it was interchangeable with the same fittings />: that are used on the other rods. Although it had a pretty good stiffness />: to weight ratio, it was also a bit fragile for the heavy use and harsh />: flying that I like to do. I've never used them because I could break them />: so easily. />
any suggestions on locating sources for spars, I,m in the Boston MA area. --Dave Mainwaring Northeast Resources (617) 455 9920 FAX 617 449 1826
= = = = = = = = = = = = = = = = = = = = = = = = = = = = = = = = = = = = = = =
Date: Fri, 17 Feb 1995 08:15:23 -1000 From: sasaki@netope.harvard.edu (Marty Sasaki) Message-Id: <3i2p3r$4u5@netope.harvard.edu> Organization: Harvard University Subject: Re: New Product - Improved SkyShark 2P rod
In article <1995Feb17.114426.12799@k12.ucs.umass.edu>, mainwari@k12.ucs.umass.edu (Dave Mainwaring (Northeast Resources)) writes: |>any suggestions on locating sources for spars, I,m in the Boston MA area.
Don McCasland at Kites of Boston has a pretty good stock of spars and can order anything that he doesn't have.
I can provide small numbers of spars for repairs and such. I don't really do retail, however, but am happy to help out if you need something on the field and I have it with me.
I highly recommend Tom Marvin at Hang-em High Fabrics in Richmond VA. Tom has all sorts of spars and fittings along with Icarex and regular ripstop nylon.
Another good source of spars is the High Fly Kite Co in New Jersey. Fran Gramkowski has lots of experience with all sorts of kite spars.
--Marty Sasaki Harvard University Sasaki Kite Fabrications sasaki@harvard.edu Network Services Division 90 Melrose Street 617-496-4320 10 Ware Street Arlington, MA 02174 Cambridge, MA 02138-4002 phone/fax: 617-646-1925
[/quote]

2008/12/01
Pat's Hacks, servo motor conversions
Thank Pat Matthews for sharing the following post on servo hacks!
Servos are wonderful little devices! Not only do they provide an inexpensive way to activate mechanical linkages through radio control, but they can be hacked to provide inexpensive drive units for small boats and cars with their self-contained motors and electronic speed controls (ESC's), and they can serve as part of a simple on/off power control switch.

Basic servos can be found for less than $10
A servo is a little gear-motor, ESC, and a position sensing device in one package. Rip the guts out of the case, and you'll have:
a) A lead from the Rx… it carries +5 volts, ground, and a signal wire.
b) A circuit board.
c) A small 5v motor, which may be soldered directly to the circuit board.
d) A pile of gears connecting the motor to the servo output. Bin these.
e) A potentiometer (pot, or variable resistor) connected to the circuit board with 3 leads, and mechanically connected to the servo output.

Step 1: A few screws loose, and things start to open up.

Step 2: Pressing on the two shafts popped the board out of the case. Don't pry directly on the board.

Step 3: Using desoldering braid to wick off the solder, makes it easier to pull off the motor.
 Loose parts.
Hack 1: Going Pot Free
First trick in hacking a servo: Disconnect the pot from the servo output. Normally, as the pot moves with the servo output, it produces a varying voltage which is read by the circuit board, telling the servo that the output has moved to the desired position (or not). See Schematic 1. When you disconnect this little knob from the gear train and the servo output, leaving it in it's centered position, and then command servo movement at the radio, the circuit board never detects any movement, and thus keeps telling the motor to run.
So now center the stick, servo is happy, goes nowhere; forward stick, and the motor kicks in and just keeps buzzing; reverse stick, ditto the other way. You'll want to put a drop of glue on the pot to keep it from drifting.
Hack 1a: If the Pot itself doesn't suit you, you can replace it with a pair of 2.2k ohm resistors- both tied to the center tap's lead, opposite ends of the resistors to the pot's "outer" leads.

Another nice feature- most servos have a soft start, which means that a little bit of stick will give part throttle… other than that, it's pretty much off/on.
Hack 2: Motor Swapping
Next hack: The little motors that comes with servos may not suit you… they have tiny little short shafts. Any small 6v toy motor will do instead, as long as you don't load it heavily- the servo's ESC isn't designed to deliver much current! If the motor is connected to the circuit board with wires, no problem to swap them. If the motor is soldered directly to the board, you'll need to work a little more carefully. You can get "solder braid" from Radio Shack- braided copper wire that you heat with a soldering iron while pressing onto the board's soldered joint. The braid sucks up the solder, and you can pull the motor loose much more easily.
If you decide to keep the servo motor, no problem. You can leave the motor on the board- that's what I did on my plastic landing craft. And you can get tiny little plastic u-joints to press onto various miniature shaft sizes, metric and English, from Northwest Shortlines- catalog page at http://www.nwsl.com/Catalog/cat-UJoint.pdf

 |  |
| Servo motor still attached to board. Motor can is pressed into plastic structure. | Twin drive in landing craft. |
 |  |
| Servo motor set in Revell Trawler | Close-up of NWSL U-Joint on servo motor's 1.5mm shaft. "Horn" is sized for 1/16" prop shaft, which is only slightly larger than 1.5mm. |

Pat'web site http://www.geocities.com/patsmodels/servo/
2008/11/18

2008/11/13
The Star 45 R/C Model Sail Boat
The Star 45 R/C Model Sail Boat - Builders Journal
Construction photographs, articles about the Star 45. -- Join the AMYA STAR45 Class discussion group http://groups.yahoo.com/group/Star45/ -- Read about How To Build A Wooden Star45 R/C Sailing Model! Browse http://woodstar45.blogspot.com/ Based on the International Star Boat this semi-scale Star45 can be scratch built by novice or seasoned skipper. Easily radio controlled and large enough to see out on the water this is a classic model model built by hobbyists for over thirty years!
2008/10/16
Thinning Epoxy
http://www.seqair.com/skunkworks/Glues/WestSystem/Thinning/Thinning.html
"This article appeared in the Fall 1999 issue of Epoxyworks, published by Gougeon Brothers, manufacturers of the West System epoxies." Brian Knight thanks Gougeon for permission to publish this in the December 1999 Falco Builders Letter. "
Here are key excerpts for your review and discussion:
"With wood, the best method of thinning epoxy with heat is to warm the wood and have the resin and hardener at room temperature. Mix the components and apply the mixture to the warm wood surface. Remove the heat source just before the epoxy is applied. When the epoxy mixture comes in contact with the warm wood, it gets warm and its viscosity becomes lower. As the temperature of the wood falls, the thin epoxy is drawn in deeply before it begins to gel. By heating the substrate instead of the components, you get the best of both worlds-low viscosity epoxy on the work surface and longer working time in the mixing pot."
Thinning epoxy with solvent
Adding solvent is a quick, simple method of thinning epoxy, but unlike using heat to thin it, the strength and moisture resistance of the cured epoxy are drastically affected. Below are some of the effects adding solvent has on West System epoxy. While there are a large number of chemicals available to thin epoxy, we selected acetone, lacquer thinner and denatured alcohol for this discussion because they are commonly available and do a good job of reducing viscosity. Additionally, these solvents evaporate quickly and are less likely to be trapped in the cured epoxy-an important characteristic. For a variety of reasons, fast evaporating lacquer thinner appears to be more appropriate for thinning purposes than acetone or alcohol.
2008/10/15
So you want to build a sailing model
Join a model boat forum for advice.
Buy or borrow books on boat building.
Decide on type of planking and wood to be used to build the model.
Set aside a work space for building.
Review the bill of materials need to build the model and buy the materials.
Order deck and mast fittings.
Order mast (if you are buying the mast) and order sails (or sail material).
Choose the radio system, buy a sail control unit, Order keel bulb or get advice and discuss issues of building your own.
While the hull is under construction build:
Keel fin and ballast bulb
Rudder assembly
Make or assemble spars ( mast and booms)
Build cradle to hold boat under construction and when finished.
Test Radio System and sail control unit
After hull is planked:
Install keel trunk or make provisions for mounting keel.
Install radio and sail control unit, Then remove while construction continues.
Construct deck and hatches
Install/mount deck fittings
Test access to radio and sail control inside the hull.
Provide a exit guide for radio antenna so it can be attached to mast or stays.
Install power switch for turning off batteries
Test mount keel
Paint hull, rudder and keel
Assemble hull, rudder and keel
Set up mast and boom.
Install radio controls.
Check running rigging.
Attach Sails
dry sail model
--
Sail
Display
Storage
Hull Templates - bulkheads for building model sailboat, S45


The grid shown is set to 1/4 inch squares. So if you print the templates you can check the size by making sure the grid yields a 1/4 square.
Modelers will use different building materials for the model.These are JPG drawing and print outs may require adjustments to get the widths to correct sizing. For a Star45 AMYA class you need to make adjustments to allow for planking thickness. The rules establish the maximum allowable beam dimension and hull length.
Most browsers will allow you to right click and open the jpg files. You can then save them to your machine.
This set of templates are based on drawing from John Fisher back around August 2006. John may have new and updated drawings available. Check with http://groups.yahoo.com/search?query=star45 membership required.
If you want to scale to use for different model you can change the print out to give you a different grid size.
I want to thank J. Herrmann, www.graphicLanguageOnline.com, for his assistance in converting pdf's to jpg drawing, adding color to the templates and adding the grid to the final images.Rudder templates for a Star45 Class sailing model.The grid shown is set for 1/4 inch squares. So if you print the templates you can check the size by making sure the grid yields a 1/4 inch square.
This set of templates are based on drawing from John Fisher. John may have new and updated drawings available. Check with http://groups.yahoo.com/search?query=star45 membership required.
I want to thank J. Herrmann, www.graphicLanguageOnline.com, for his assistance in converting pdf's to jpg drawing, adding color to the templates and adding the grid to the final images.

These are half shadow that ar eplaced between the templates to add strength to the hull.
Keel Templates for S45 model sail boat
.jpg)
.jpg)
.jpg)
.jpg)
Building templates for S45 Keel fin.
Originals drawings are based on 1/16 ply.
Modeler may want to use different building materials for the fin.
Final keel fin will be shaped the builder. Also these are JPG drawing and print outs may require adjustments to get the templates to correct sizing.
The grid shown is set for 1/4 inch squares. So if you print the templates you can check the size by making sure the grid is a 1/4 square. If you want to scale the keel fins for another model you can change the print out to give you a different grid size.
This set of templates are based on bolt mounting. The grid makes it easy to add to the template to have the keel extend into the hull or extend into the keel bulb. Modeler's choice.
Most browsers will allow you to right click and open the jpg images. You can then save them to your machine.
This set of templates are based on drawing from John Fisher 2006. John may have new and updated drawings available. Check with http://groups.yahoo.com/search?query=star45 membership required.
I want to thank J. Herrmann, www.graphicLanguageOnline.com, for his assistance in converting pdf's to jpg drawing, adding color to the templates and adding the grid to the final images.
Rudder templates for a Star45 Class sailing model


Rudder templates for a Star45 Class sailing model.The grid shown is set for 1/4 inch squares. So if you print the templates you can check the size by making sure the grid yields a 1/4 inch square.
This set of templates are based on drawing from John Fisher. John may have new and updated drawings available. Check with http://groups.yahoo.com/search?query=star45 membership required.
I want to thank J. Herrmann, www.graphicLanguageOnline.com, for his assistance in converting pdf's to jpg drawing, adding color to the templates and adding the grid to the final images.
Model Sailboat Plans on line


Most browsers will allow you to right click and open the jpg images. You can then save them to your machine.
This set of plans are based on drawing from John Fisher 2006. John may have new and updated drawings available. Check with http://groups.yahoo.com/search?query=star45 membership required.
I want to thank J. Herrmann, www.graphicLanguageOnline.com, for his assistance in converting pdf's to jpg drawing, adding color to the templates and adding the grid to the final images
You can print these drawing to many different sizes.They are not necessarily to scale.
HULL defintion of:
HULL defintion of:
The outer shell, including frames, ribs, interior bulkheads, exclusive of masts, rigging, deck and equipment.
"bare hull" defintion of:
A model boat's outer shell, EXCLUDING, ribs, interior bulkheads, exclusive of masts, rigging, deck and equipment. Example. A fiberglass hull as pulled from a mold.
--
A wooden hull:
one constructed of wood (including plywood).

one constructed of reinforced plastic (cloth impregnated with resin). Nominally referred to as a fiberglass hull.
--
a hull constructed of wood and covered with reinforced plastic (cloth impregnated with resin).
 OR:
OR:a hull constructed using a laminate (sandwich) consisting of reinforced plastic (cloth impregnated with resin) on two sides of a core . Core materials may be foam or wood.
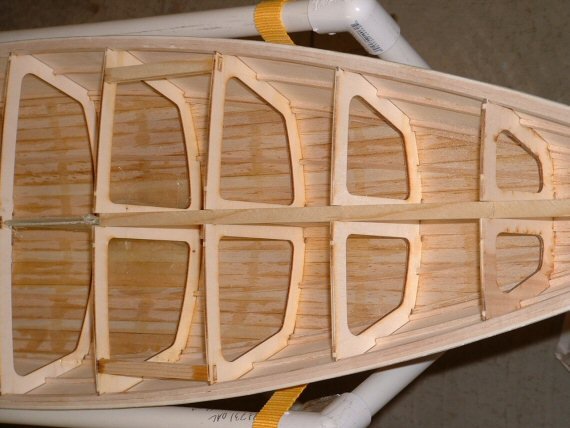
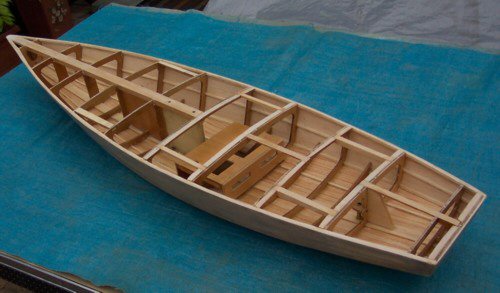
Inside a R/C sailing model hull
Radio Board stringers between bulkheads
(Note the method of keel support using these stringers)

Radio Board

Rudder Servo

Mast support (inside hull)